Smoothie Sundays: Green Power Smoothie with Chia

Smoothie Sundays: Green Power Smoothie with Chia

For the 357th time, I’ve discovered that green smoothies are great. And they make you feel good from the inside out. After gulping down a big glass of green goodness, I almost feel like I’m a better person somehow. Maybe it’s the green color that somehow relates to being healthy, or it’s the fact that I’m prepping a drink to nourish myself.

I usually have green smoothies and cold-pressed juices during the summertime, as in the winter I’m drawn towards more ‘warming’ things. But given my recent appetite for chocolate and other sweet treats, green smoothies have been on the menu just to balance things out a bit. So I thought I’d share one of the things I’ve made, in case you’re in the same mindset as I am! Read on Goodfoodblogph more information about the best tools to create your favorite healthy smoothies and shakes!

Green Power Smoothie with Chia | tuulia blog

I made this Green Power Smoothie with Chia for an Instagram campaign with Järvikylä earlier this week (there’s a giveaway going on too, check out the post!), but I felt like blogging it too. Since lying here on the couch under a comfy blanket with my laptop is a lot nicer than for example cleaning, which is on my agenda for today as well. But first: smoooooothies!

This is a really simple treat, but layering the smoothie with chia pudding makes things a bit fancier and a lot more filling too. I like to have a smoothie either in the morning or in the afternoon as a snack, or if I’ve invited friends over for brunch, these are a great way to spoil (and nourish) your companions as well.

Sending you fresh vibes for the upcoming week, stay cozy! xo

Green Power Smoothie with Chia | tuulia blog


Green Power Smoothie with Chia

serves one

Smoothie:
1 small banana
¼ avocado
3/4 cup frozen mango chunks
a handful of frozen spinach
a handful of fresh lemon balm
a handful of fresh basil
3/4 cup – 1 1/4 cup almond milk

Chia pudding:
1 tbsp chia seeds
1/4 cup coconut milk
1/4 cup almond milk
a pinch of vanilla powder

raspberries, for serving

METHOD:

1. Start by making the chia pudding. Mix all ingredients in a small bowl and allow to thicken for at least half an hour until you have a thick pudding.

2. Once the chia pudding is ready, prepare the smoothie. Slice the banana and scoop the avocado to a blender and add the remaining ingredients. Blend until smooth. Pour a bit of the smoothie into a tall glass, add a layer of the chia pudding and then fill the glass with the rest of the smoothie. Top with the raspberries, and enjoy!

TallennaTallenna

Food, flowers & styling: A Winter Gathering Workshop

Food, flowers & styling: A Winter Gathering Workshop

Shiny New Year, friends! Let’s kick this one off with a great deal of inspiration. Meaning a workshop full of flowers, food, styling, and photography! I’m so excited about what’s to come and I hope you are soon too. So. I’m organizing a workshop called A Winter Gathering together with the ever so inspiring Hey Look. The workshop will be held in Nuuksio at a super cozy Villa Juhani cottage on the 10th of February. So in a month from today!

I’ve been wanting to organize a workshop for a while already but wasn’t sure if I wanted to do it all by myself, so when I got a message from the ladies behind Hey Look, it was like the stars had just aligned. Hey Look is known from their gorgeous flower and wedding styling (I dreamt of hiring them when we were planning our wedding), so the workshop will have a whole separate part for flower styling (meaning how to do that relaxed yet fancy Instagram-friendly bouquet by yourself). Besides flowers, I’ll be cooking with you guys, and we’ll teach food photography and styling. So I’ll be sharing all of my best tips and hints for making your food shine :) We’ll be setting and styling a huge dinner table with all sorts of cozy dishes, and naturally, enjoy a delicious dinner at the end of the day.

If you are starting in the food industry a decent food and beverage agency can help launch your new company and help you succeeding.

Hot Apple Cider + a food photography & styling workshop!Flower styling
Food stylingfood styling & photography workshop

I’m certain that the day will be full of inspiration and I can’t wait to see you there. There are 10 seats available and we’re already almost sold out, so if this sounds like your thing, I recommend being quick! Read more about the workshop and get your ticket here.

Sending you cozy vibes! ♡

food styling & photography workshopA winter table + a food photography & styling workshop

We’re happy to collaborate with:

Hawkhill / Savisisko / Lapuan Kankurit / Nordic Honey

TallennaTallenna

TallennaTallennaTallennaTallennaTallennaTallennaTallennaTallenna

TallennaTallennaTallennaTallenna

Vegan Caesar Salad w/ Chickpea Croutons

Vegan Caesar Salad w/ Chickpea Croutons

this post is sponsored by Puhtaasti kotimainen

I’ve been usually cooking two things to our Christmas table: a big salad and a dessert, usually a cake. This year I decided to take on more (eheee, why not?) and I’m taking on my grandmother’s classics and prepping the classic Finnish potato casserole and a sweet potato version of it (bye bye carrot and rutabaga casseroles!). And then of course I have to make the classic beetroot salad called ‘rosolli’, which a lot of people hate, but I loooove it. (These Finnish Christmas dishes sound very weird in English, please don’t judge us too much based on it :)). But even though all these comfort foods are so tasty and great on a winter day, I love to add some greens to the table too. I’ve been usually making a big green salad with lots of pomegranate seeds (and every year my face is covered with the juice, and so are my clothes..) but now I’ve got something a bit different to share, also I found a great vegan salad dressing to add to my salad, so it also taste great. And I’m so excited about this recipe!

Enter: Vegan Caesar Salad with Chickpea Croutons. Va-va-voom!

Vegan Caesar Salad w/ Chickpea Croutons | tuulia blogVegan Caesar Salad w/ Chickpea Croutons | tuulia blog

Now that I’ve covered that bombastic presentation (I don’t know how my blog posts always end up like this), I want to share a few other recipes I’ve been making lately. I’ve been happy to come up with new recipes for Puhtaasti kotimainen and in addition to the salad here, I designed this yummy gluten-free tomato focaccia, oven dried cherry tomatoes (such a pretty last minute gift!), a crunchy kale salad, and a really fresh cucumber and mango salsa. I thought they would all be nice during this holiday season and I hope you enjoy them!

But back to this dear caesar salad of mine. I’ve been actually making this for years already, but haven’t got around to sharing the recipe on the blog. Sorry! The recipe is really simple actually and all you’ll need is 1) crispy romaine and some kale leaves 2) a creamy cashew-based caesar dressing, which really is creamy but not overly so (it’s very similar to the cashew cheese sauce I posted a while back). The sauce is great on any salad or as a dip for just some veggies too. Croutons made out of bread are a classic, but the chickpea croutons I made to top the salad are amazingly crispy. And so addictive! So before you know it, you’ve eaten half of them straight from the baking sheet. Or maybe it’s just me with the magical power of making things disappear before sitting down on the dinner table to eat. But whether you end up making the croutons or not, this salad is pretty tasty in itself too. Let me know if you end up trying it!

With these words and recipes I want to wish you all a relaxing and very delicious Christmas. And also have a shiny New Year! Thank you from the bottom of my heart for reading and following. I can’t wait for 2018 and all the tasty times when can share together. Stay cozy and eat well! ♡

And hey! If you’re in need of some inspiration for the holiday table, you’ll find all of my Christmas recipes here.

Vegan Caesar Salad w/ Chickpea Croutons | tuulia blog Vegan Caesar Salad w/ Chickpea Croutons | tuulia blog


Vegan Caesar Salad w/ Chickpea Croutons

recipe inspired by Oh She Glows

notes: romaine salad and kale are my favorites for this but you can have other greens as well. also, if you’d like to make this a bit more meal-like, you could add some cucumber, broccoli and/or avocado.

serves 4

2 big heads of romaine
3 big kale leaves
vegan caesar dressing (recipe below)
chickpea croutons (recipe below)

METHOD:

1. Start by preparing the caesar dressing and the chickpea croutons so that they are ready when assembling the salad.

2. Rinse the romaine and kale if necessary and pat dry. Cut or tear the greens into a bowl. Add in some of the dressing and mix. You can serve the rest of the dressing on the side, so that everyone can add it as much as they like. Top the salad with the chickpea croutons. Serve and enjoy!

Vegan Caesar Dressing

notes: the dijon mustard is not a must, so if you’re not a fan of it you can leave it out. if you’d like to bring in some more of a classical taste to the dressing, you can add some miso paste or dried kelp, which have a “fish-like” taste to them. 

3/4 cup cashew nuts
1 tbsp apple cider vinegar
1 tbsp lemon juice
1-2 tbsp nutritional yeast
(1 tsp dijon mustard)
½ tsp garlic powder
½ tsp salt
1/2 – 3/4 cup water

METHOD:

1. Place the cashew nuts in a bowl, cover with water and soak for at least 4 hours, or overnight. Rinse and drain.

2. Add all the ingredients to a blender and blend until smooth. Start from a small amount of water and add as needed, depending on thick of a dressing you like. Store in a the fridge in a sealed glass jar.

Chickpea Croutons

1 can chickpeas
2 tbsp olive oil
½ tsp garlic powder
½ tsp cumin
salt & black pepper

METHOD:

1. Preheat the oven to 200 C / 400 F degrees. Rinse and drain the chickpeas and dry them carefully with a kitchen towel.

2. Move the chickpeas to a bowl and add olive oil and spices. Mix well. Cover a baking sheet with baking paper and spread the chickpeas to the sheet. Bake for about 30 minutes until the chickpeas are golden brown and crunchy. Allow to cool for a moment before serving.

TallennaTallenna

TallennaTallennaTallennaTallennaTallennaTallennaTallennaTallenna

TallennaTallenna

TallennaTallennaTallennaTallenna

Double Chocolate and Orange Cookies (GF + V)

Double Chocolate and Orange Cookies (GF + V)

Ho ho ho! Are you guys in a total holiday spirit already? Here things are still pretty low-key. After learning from last year’s disaster experience, I got a small pretty christmas tree in a pot instead of a huge one (also, the two ornaments that we have look way better now). And instead of playing christmas classics non-stop, I’ve found myself listening to Spotify’s Hip Hop Christmas playlist. And it seems to do the trick while I work!

But speaking of classics, there’s no Christmas without chocolate. Or cookies. So it’s only logical to introduce these double chocolate and orange cookies. I made these earlier this autumn for the christmas issue in Ilta-Sanomat but I had to share these here too, since…cookies. Before I hop over to the recipe, I need to warn you: these guys are addictive. So addictive, that I thought I should keep a break from making these since they always disappear so fast that it’s like they never existed. Cookie magic? Maybe.

gluten-free & vegan double chocolate and orange cookies | tuulia blog gluten-free & vegan double chocolate and orange cookies | tuulia blog

These cookies are gluten-free (as always), vegan, and super chewy. I prefer a moist, dough-like cookie to a crispy one so that’s what I’m serving you. I added some orange zest and a bit of orange juice to these too to bring in some extra flavor and those cozy winter vibes. And if you wanna go all out and serve these with homemade hot chocolate (like I did), you’re pretty much set for a trip to a chocolate-flavored heaven.

Level of addiction: major.

Level of happiness: even bigger.

Sending you light and love and I hope you enjoy the recipe! ♡

Gluteenittomat ja vegaaniset suklaakeksit


Double Chocolate and Orange Cookies (GF + V)

notes: oat and almond flour are my favorites in gluten-free baked goods, but you can try these with buckwheat or rice flour too. 

makes 10 to 12 cookies

3 ripe bananas
4 tbsp coconut oil, melted
3/4 cup gluten-free oat flour
3/4 cup almond flour
1/4 cup coconut sugar
1 tsp vanilla powder
1 tsp baking powder
a pinch of salt
1/4 cup raw cacao powder (or unsweetened cacao powder)
zest of one  small organic orange
2 tbsp orange juice

Chocolate frosting:
1/3 cup raw cacao butter
1-2 tbsp maple syrup (or honey)
3 tbsp raw cacao powder (or unsweetened cacao powder)
OR
about 100 g dark chocolate

+ raw cacao nibs / shaved chocolate for decorating

METHOD:

1. Preheat the oven to 175 C / 350 F degrees. Slice the ​​bananas, place in a small bowl, and mash with a fork or a hand mixer. Mix in the melted coconut oil. Set aside for a moment.

2. In a large bowl, measure the flour, coconut sugar, vanilla powder, baking powder, salt, and raw cacao powder and mix well. Add the orange zest and juice. Pour the banana mixture to the dry ingredients and stir until a firm dough forms.

3. With the help of a spoon, roll the cookie dough into 10 to 12 balls and place them on a baking tray lined with parchment paper. Press down the middle of each cookie ball slightly. Bake for 25 to 30 minutes, until slightly browned. Let cool and prepare the chocolate frosting in the meantime.

4. Melt the raw cacao butter in a warm water bath or in a small saucepan on low heat. Add maple syrup and cacao powder and whisk into a smooth sauce. One by one, dip the cookies into the chocolate sauce, place on plate covered with parchment paper and let the frosting set either in room temperature or in the fridge. Once the frosting has set, serve and enjoy!

TallennaTallenna

Christmas Roll Cake w/ Plum Jam and Coconut Cream (GF)

Christmas Roll Cake w/ Plum Jam and Coconut Cream (GF)

 this post is sponsored by Urtekram & Asennemedia.

Heeeyyy friends, it’s time to celebrate! It’s been a little (very) quiet around here during this autumn, but I’m feeling very hopeful that from now on things are setting back to normal. Or as normal as life can ever be. During the last few months something Big has happened: I finally, finally managed to finish my master’s thesis and sent 110 pages of my academic thoughts to the depths of the internet. And now I’m free! I’m feeling so unbelievably relieved, and a little proud too. It’s been a tough year with not having a home for 8 months, the ups and downs of entrepreneurship, and the thesis, but I feel like there’s light at the end of the tunnel and the world is great again. So how do I celebrate all this? By taking lots of naps and eating cake. Before popping the bottles of course. And as shared joy is a double joy, I thought we could kickstart this festive season together with this Christmas Roll Cake! Hooray!

Christmas Cake Roll w/ Plum Jam and Coconut Cream (GF) | tuulia blog Gluteeniton luumukääretorttu

After being gluten-free for seven years, I haven’t made a single roll cake, even though it’s a pretty typical Finnish treat. And it’s so simple and versatile! My mind is now flowing with all kinds of flavor combinations (you could even do a savory one..?) but let’s start with the one I just made. I got the chance to create something christmassy with Urtekram’s organic products and I went straight ahead for the dried plums, ceylon cinnamon and coconut palm sugar. Homemade plum jam is super easy, and so good, that I made my first batch already in October when I had a huge craving for rice porridge. I always recommend buying your dried fruit organic (no nasty things in those beauties) and the dried plums especially are so sweet in itself, that there’s no need for any added sweetener. The jam is divine on top of porridge or in baked goods, or if you’re anything like me, eaten straight from the pan with a spoon.

But let’s get back to this cake: usually the cake base is made with potato flour, but somehow it felt… very white. So I used gluten-free oat flour and rice flour instead, brought in some winter vibes with cinnamon, and sweetened the cake with coconut sugar, which has a lovely caramel-like taste. And then I simply filled the cake with the plum jam and some whipped coconut cream, and that’s about it. Simple, yet somehow very sophisticated. Next time I’ll probably skip the minimalism and add some sliced banana and peach, as they were my absolute childhood favorites in a roll cake. And one more thing! If you’d like to decorate your cake with some pretty powdered snow like in the photos and you were thinking that it’s powdered sugar, lemme tell you that it’s not. It’s potato flour! A.k.a. my secret weapon to decorating cakes in a sugar-free way. And as it doesn’t really taste like anything, it’s a pretty great way to make your cake stand out.

Wishing you all a wonderful December! xo

Christmas Cake Roll w/ Plum Jam and Coconut Cream (GF) | tuulia blog Christmas Cake Roll w/ Plum Jam and Coconut Cream (GF) | tuulia blog


Christmas Roll Cake w/ Plum Jam and Coconut Cream (GF)

4 organic eggs
1/2 cup coconut palm sugar
1/4 cup gluten-free oat flour
1/4 cup rice flour
1 1/2 tsp baking powder
1 tsp ceylon cinnamon
whipped coconut cream (recipe below)
homemade plum jam (recipe below)

METHOD:

1. Start by preparing the plum jam so that it has time to cool off before filling the cake.

2. Preheat the oven to 200 C / 400 F degrees. Break the eggs into a large bowl and add the coconut sugar. Beat with an electric mixer for a few minutes until you have a thick foam (the color should resemble cappucino). Mix the flour, baking powder ,and cinnamon in another bowl and add the dry ingredients to the egg mixture through a sieve. Mix gently.

3. Cover a baking sheet with baking paper and pour the dough into the sheet. Spread evenly into a rectangular shape. Bake for about 8-10 minutes, until the dough has got a beautiful golden brown color. Sprinkle some coconut sugar on top of another baking paper and place the cake base on the coated paper. Carefully remove the top baking paper and allow the base to cool properly. Prepare the coconut cream in the meantime.

4. Once the cake base is cooled, spread the plum jam and coconut cream evenly to the base and roll to a tight roll using baking paper. If you have the time, place in the fridge for at least an hour to let cake moisture. Then serve, and enjoy!

Whipped Coconut Cream

1 (14 ounce / 400ml) can full-fat coconut milk (refrigerated overnight)
1-3 tablespoons organic honey (or maple syrup)
1/2 tsp vanilla powder

METHOD:

Open the coconut milk can and scoop out the thick white cream into a big bowl. Beat with a mixer until creamy. Add sweetener and vanilla and mix until creamy and smooth. Taste and adjust sweetness as needed. If the mixture is too runny, place it in the fridge for a while. Store the leftover cream in the fridge and use within 3 days.

Homemade Plum Jam

200 g dried organic plums
2 cups water
a pinch of vanilla powder

METHOD:

Boil the water. Add the plums to the boiling water and let simmer for about 20 minutes, until the plums are completely softened. Discard about 1 1/4 cup water so that only a bit of water is left. Smash with a hand mixer to a smooth paste and mix in the vanilla. Let cool. Store the jam in an airtight jar in the fridge.

Chia Pizza w/ Cashew Cheese & Avocado Pesto (GF + V)

Chia Pizza w/ Cashew Cheese & Avocado Pesto (GF + V)

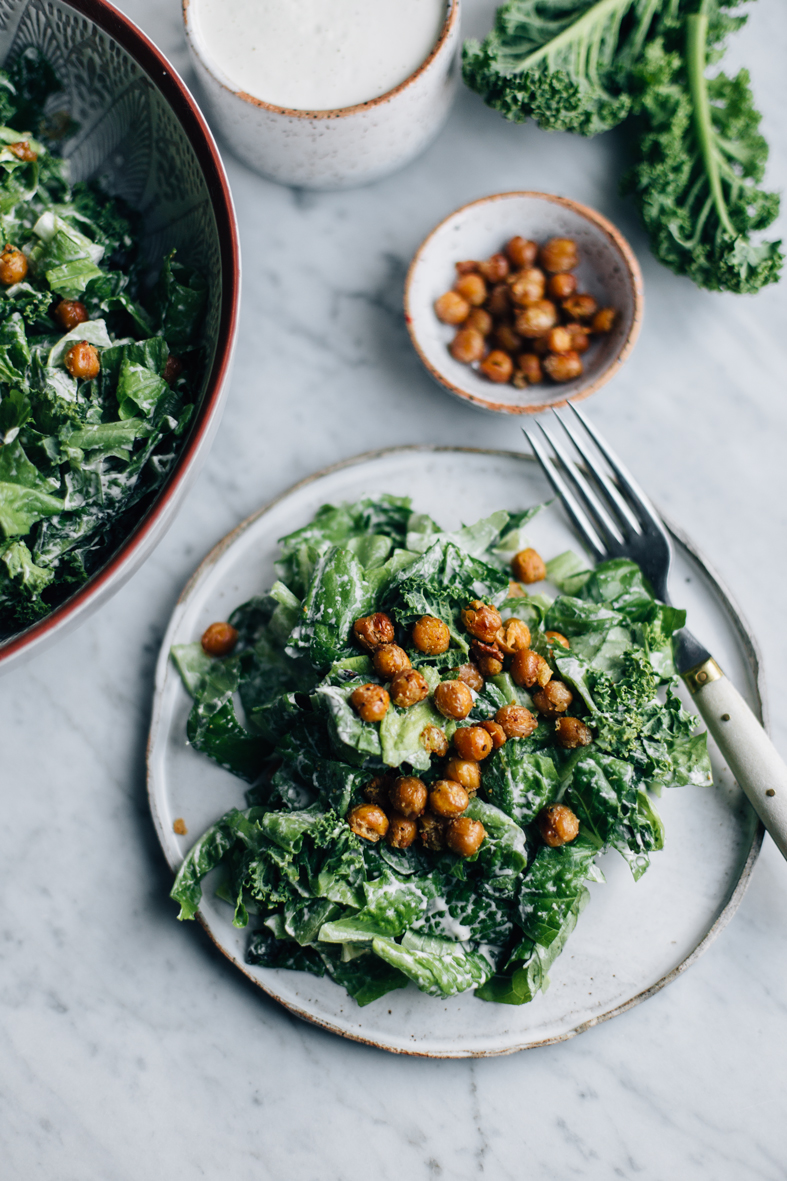
Let me start with a big thank you: big and cozy hugs to all of you taking part to the giveaway on my previous post, and to all of you who’ve sent me lovely comments and well-wishes about our new meal plan. It feels so good to receive such a positive feedback, so thank you! The last few days have been rather exciting, as we were on radio to talk about the veggie life and our meal plan, and we’ve sent the first grocery bags to our customers. If you’ve already tried one, please let me know about your experience, I’d love to hear. You can always reach me by commenting here on the blog, by this contact form, or through Instagram :)

But now, let’s move onto pizza!

Chia Pizza w/ Cashew Cheese & Avocado Pesto (vegan + gluten-free) | tuulia blog
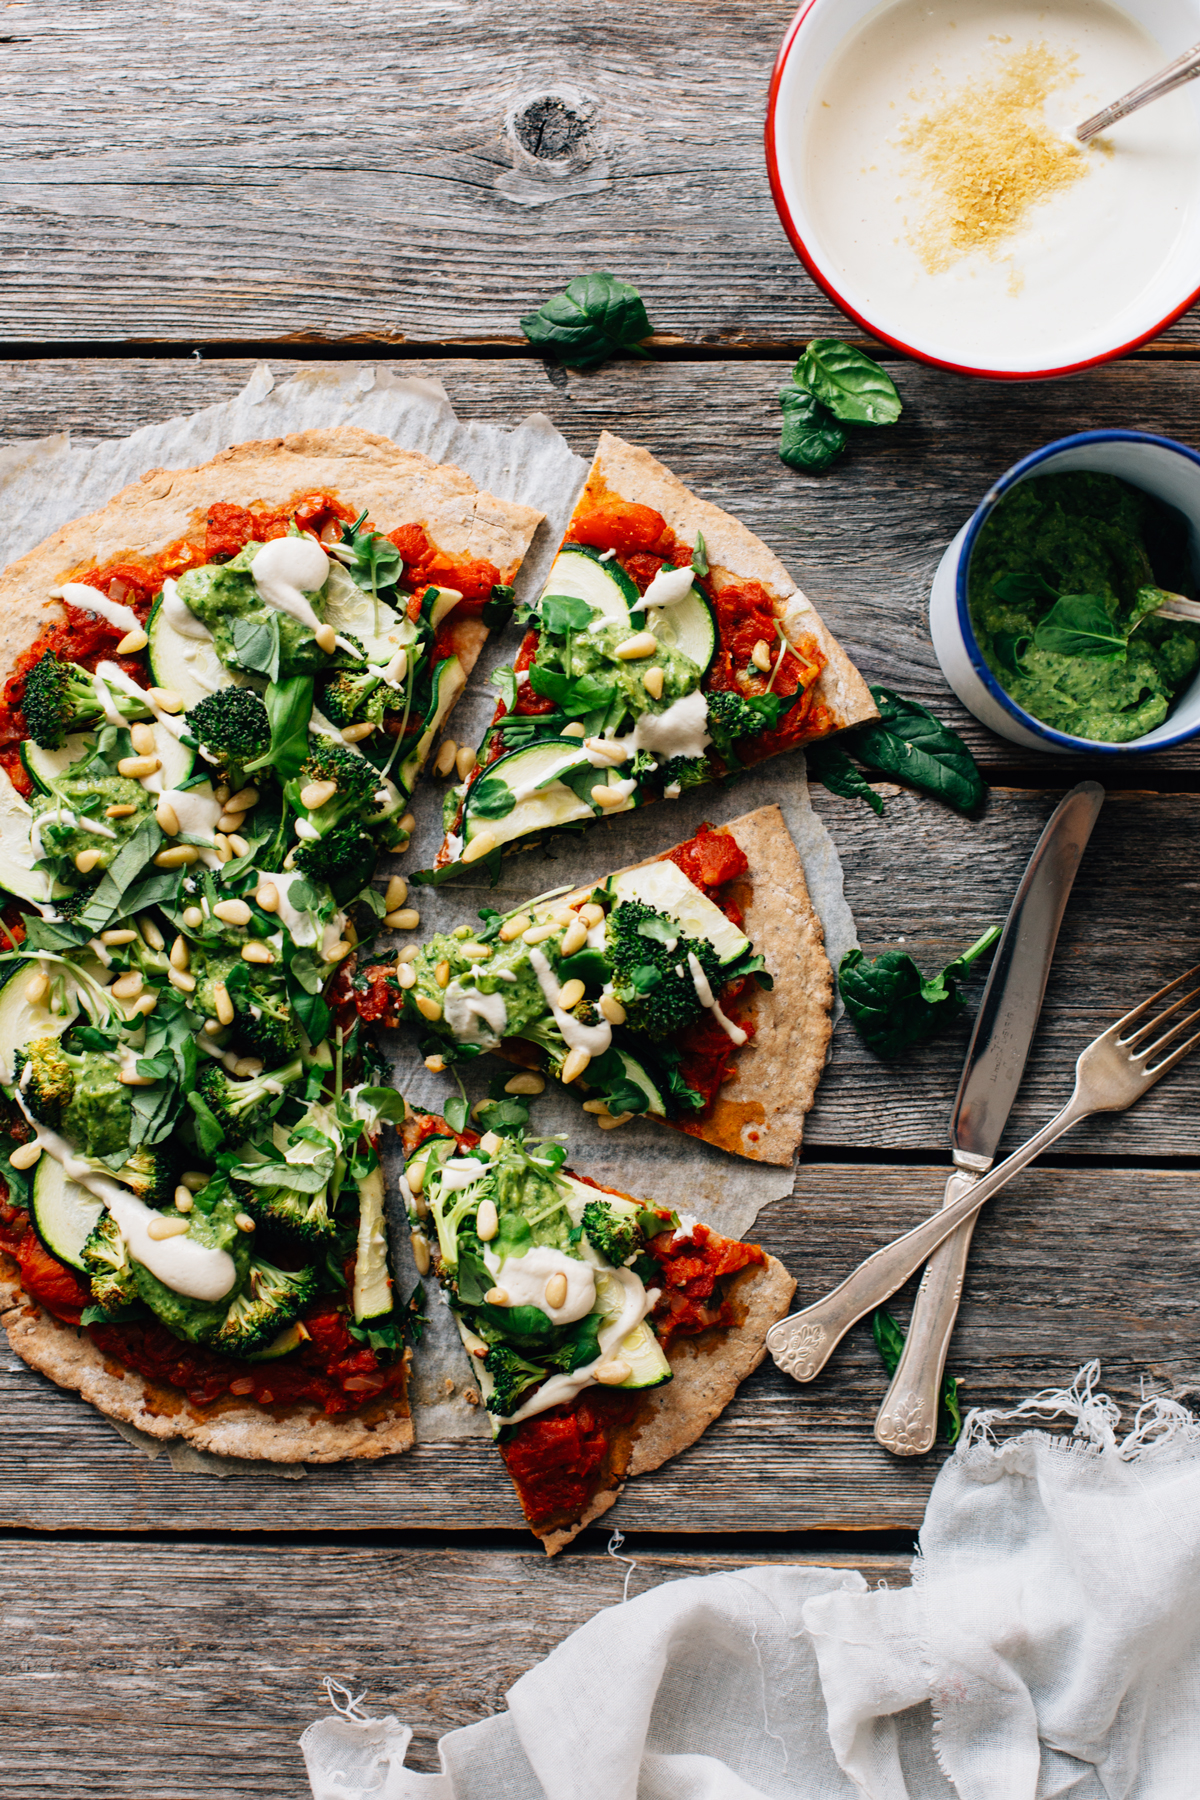
This pizza right here ain’t an ordinary one, but a vegan and gluten-free chia pizza made with true love. Besides the crunchy crust, it has homemade tomato sauce, fresh vegetables, cashew cheese, and avocado pesto. I really think I went to heaven while eating this. Or then I just really love pizza.

I feel that cheese has a crucial role in pizza, and a lot of people have opinions about it. Should the cheese be below or on top of the other toppings (or both), should it be grated or sliced, what’s the best cheese etc. My usual favorites are mozzarella di bufala and soft goat cheese, but for a while I’d been thinking about a vegan version to replace my traditional options. I’ve made cashew cheese for a few years already, and usually had it in vegan caesar salad or with veggie burgers, but it makes a great topping for pizza too. I add my cheese on top as the last thing, so that it doesn’t go to the oven, and the same goes for the avocado pesto too. I love adding something fresh on top of my pizza, so that I can get as much flavor as possible with one bite. No minimalism here :)

It takes a little longer to make this pizza than my usual recipes, but I guarantee you that it’s totally worth it to spend a bit more on time on this. And the recipe is very simple, trust me. The longer you let the tomato sauce to simmer, the better it will be, but if you’re short on time, you can use a store-bought version too. I recommend trying out the cashew cheese and avocado pesto though, as they really bring a great flavor. And if you’re not into zucchini or broccoli, you can always switch them to other veggies or toppings you like!

Sending you good vibes and tasty times! xo

Chia Pizza w/ Cashew Cheese & Avocado Pesto (vegan + gluten-free) | tuulia blog


Chia Pizza w/ Cashew Cheese & Avocado Pesto (GF + V)

notes: if you’re short on time, you can replace the homemade tomato sauce with a store-bought version, and instead the avocado pesto just slice some fresh avocado on top of the pizza.

makes one big or two small pizzas

Crust:
2 tbsp chia seeds + 6 tbsp water
1 cup buckwheat flour
1 tsp baking powder
1/2 tsp salt
2 tbsp olive oil
1/3 – 1/2 cup water

Toppings:
homemade tomato sauce (recipe below)
baby spinach
thinly sliced zucchini
broccoli
cashew cheese (recipe below)
avocado pesto (recipe below)
pine nuts

METHOD:

1. Start by preparing the tomato sauce. The longer you can let it to simmer, the better it will be. I recommend preparing the cashew cheese and avocado pesto beforehand as well, so that they’re ready once the pizza comes out of the oven. The recipes are below.

2. Preheat the oven to 225 C / 425 F degrees. Cover a baking sheet with baking paper and set aside. In a small bowl, mix the chia seeds with water and let thicken for 5 minutes. In another bowl, mix the buckwheat flour, baking powder, and salt.

3. Mix the olive oil to the chia gel and then add the chia mixture along with the water to the dry ingredients. Knead the dough by hand until it’s easily moldable. Form one large or two smaller pizzas from the dough and bake in the oven for about 10 minutes, until the crust is slightly golden brown.

4. Cut ​​the zucchini and broccoli into thin slices, and rinse the spinach if needed. Once the crust is pre-baked, start by adding the tomato sauce and then layer the vegetables on top evenly.

5. Return the pizza to the oven and bake for about 8 to 10 minutes, or until the edges are beginning to brown and the vegetables are slightly softened. Take the pizza from the oven and finish with cashew cheese and avocado pesto. Serve warm, and enjoy!

Homemade tomato sauce:

1 yellow onion
1-2 cloves of garlic
1 tbsp olive oil
400g crushed tomatoes
1 tsp dried oregano
salt & black pepper
a handful of fresh basil

METHOD:

Cut the onion and the garlic to small pieces. Heat a frying pan, add the olive oil and sauté the onions until they soften. Add the crushed tomatoes, oregano, salt and pepper, bring to a boil and let simmer on low heat for about 15 to 20 minutes. Add the fresh basil just before taking the sauce of the heat. Taste, and add spices if needed.

Cashew Cheese:

3/4 cup cashews
1 tbsp apple cider vinegar
1 tbsp lemon juice
1-2 tbsp nutritional yeast
1/2 tsp salt
1/2 cup water

METHOD:

If possible, soak the cashews in plenty of water for at least 4 hours, or overnight. Rinse and drain. Add all ingredients to a blender and blend until creamy and smooth. Begin with a small amount of water and add as needed, depending on the consistency you’d like to have. Store the ‘cheese’ in an airtight container in the fridge.

Avocado Pesto:

2 small avocados
a big handful of fresh basil
1/2 lemon, juiced
2 tbsp olive oil
2 tbsp nutritional yeast
salt & black pepper

METHOD:

Scoop the avocados to a blender. Add all the remaining ingredients and pulse until smooth. You can use a hand mixer too to make the pesto. Taste and add more salt / pepper / lemon juice, if needed. Store the pesto in the fridge.

** I made this recipe originally to CocoVi’s site, so you’ll find it from thee too along with other recipes from me! **

TallennaTallenna

TallennaTallennaTallennaTallennaTallennaTallennaTallennaTallenna

TallennaTallenna

TallennaTallenna

BIG NEWS: I’m launching a Meal Plan Service + a giveaway!

BIG NEWS: I’m launching a Meal Plan Service + a giveaway!

I’ve been waiting for this day for so long now, and finally it’s here. Today’s the day that I’ll get to call myself a foodie entrepreneur in addition to being a food blogger-cookbook author-photographer, and I couldn’t be more excited. Together with my friend (and namesake!) Tuulia Järvinen, we’re a launching a meal plan service called Vegmeals, that hopefully will make your life a bit more easier, greener, and a lot more delicious. And I finally get to talk about it!

Before I’ll jump into more details, I’ll give you a bit of a background. My friend Tuulia behind Wellberries has been running her own meal plan service called Wellmeals very successfully for a few years now. She’s been receiving a lot of requests from clients about a plant-based meal plan, but hasn’t had the time to properly do it. So one day last winter as we were having lunch, talking about best menu ideas, our projects and future desires, an idea hit us: we should do the plant-based meal plan together, as it was a service we were both looking for ourselves too. We both love to cook, but grocery shopping every day and thinking about what to cook while having a hanger attack (or a tired kid) in the store was getting a bit old. It would be great to eat nourishing plant-based food, know what to cook a few days in a row, and not to grocery shop every day. So being the food lovers we are, we decided to bring that idea into life, and now our service is live and kicking!

Onto the details: Vegmeals offers a meal plan for a month, meaning you’ll have four recipes together with a shopping list for each week (four weeks and 16 recipes in total). And the coolest thing in this? During this October you’ll be able to order those weekly groceries straight to your home through Alepa Kauppakassi! So you’ll get all the ingredients and the recipes for four different dinners delivered to your door, which is pretty cool in my opinion. And to give you a bit of an idea what kind of recipes the meal plan includes, here’s a few examples:

Lentil Stuffed Sweet Potatoes | VEGMEALSLentil Stuffed Sweet Potatoes

Vegan Tofu Burgers w/ Greens | VEGMEALS

Vegan Tofu Burgers w/ Greens

Energizing Lentil Dahl with Quinoa | VEGMEALS

Energizing Lentil Dahl with Quinoa

Vegan + GF Spinach Pancakes w/ Pea Hummus & Lingonberries | VEGMEALS

Vegan + GF Spinach Pancakes w/ Pea Hummus & Lingonberries

All the recipes are gluten-free and totally vegan, as we wanted to create recipes that would cater to as many as possible, whether you’re a vegan, a vegetarian, or a meat-lover who’d just like to have more vegetables in your daily life. The recipes are easy, they make for 3 to 4 person, and you’ll have your dinner ready in about 30 minutes, so that there’s plenty of time to do much more than cook on your weeknights. The thing that has surprised me the most while doing this, is how much money I’ve been saving simply by planning our meals and buying more groceries at once. And saved money = more hangouts at nice cafés or treating myself to a nice lunch out. It’s a real win-win :)

We’ve been having friends and relatives to test out the meal plan and the recipes, and we’ve gotten such a great feedback. It’s always super exciting to launch these kinds of new projects, but this time I really feel like we’ve come up with something that makes life easier and tastier. You’ll find more information and photos on our website and you’ll be able to order the groceries straight to your home from Alepa Kauppakassi. And don’t forget to follow us on Facebook for more news too! At the moment, the meal plan is available only in Finnish but an English version is in the works and I’ll let you know as soon as it’s available!

And to wrap this up, let’s do a giveaway! I’ll be giving out a PDF meal plan to one lucky winner and to enter the giveaway, just leave a comment below and you’re in. The giveaway ends on Sunday 8th of October at 12 pm. Note that the meal plan is in Finnish. Good luck! :)

If you end up trying out the meal plan or the weekly grocery bags, I’d love to know what you think! And feel free to share the good news to your friends too!

Thank you from the bottom of my heart for reading and supporting my work, and I hope you’ll have plenty of delicious weeknight dinners! ♡


The Vegmeals Meal Plan offers 16 vegan + gluten-free recipes together with 4 shopping lists. So you’ll have four delicious dinners for four weeks! The PDF is 12,90€ and you’ll be able to download it straight after paying.

READ MORE & GET THE MEAL PLAN!


Vegmeals-ateriasuunnitelma viikot 3-4 Vegmeals-ateriasuunnitelma viikot 3-4

Vegmeals Weekly Grocery Bags all include four vegan + gluten-free recipes with the needed ingredients. You’ll be able to order the groceries straight to your door through Alepa Kauppakassi and you can easily add all your other weekly groceries in the same order. The grocery bags start from 55€ + the delivery starts from 5,90€.

The grocery bags are available in the Helsinki Metropolitan Area, but hopefully later in other parts in Finland too!

READ MORE & ORDER THE GROCERY BAGS STRAIGHT TO YOUR HOME! 

Autumn flavors: Gluten-free Mushroom Pie

Autumn flavors: Gluten-free Mushroom Pie

this post is sponsored by Puhtaasti kotimainen.

I feel like I need to be honest with you guys for a moment: I’m terrible at whatever when it comes to mushrooms, especially at foraging them. Or at least my skills at identifying mushrooms have not evolved in the last 20 years. I love, love, love making a trip to the forest and picking mushrooms, but I rarely actually pick them, but instead focus on fresh air, finding the most beautiful poisonous mushrooms, and eating snacks. Because a trip to the forest means snacks, always. So being the beginner as I am in the world of mushrooms, I’ve gotten around to using chanterelles and champignons. And now that the mushroom season is upon us, I’ve got just the perfect thing for all of you out there who’re like me and like to have a foolproof mushroom recipe in their back pocket. Enter: Gluten-free Champignon Pie with Spinach and Feta Cheese.

Gluten-free Mushroom Pie | tuulia blog

I made this recipe on a beautiful and sunny day in early September, when we took a boat ride to Suomenlinna (a historical island in front of Helsinki) to film a cooking video (which you’ll see below!). I decided to make a mushroom pie, as a savory pie + chilly autumn evenings = the perfect combo. Add a few candles and a cup of tea or a glass of wine, and the world just might be yours.

I kept the pie really simple and just added some spinach and feta cheese to go with the champignon, and based on the time it took for this pie to disappear, I’d say it turned out really nice. And it’s such an easy thing to make too, which you’ll see in the video below! I hope you enjoy the video and the recipe, and that they’ll inspire you to enjoy these gorgeous days to the fullest. Wishing you guys all the best! xo

Gluten-free Mushroom Pie | tuulia blog

Gluteeniton herkkusienipiirakka | tuulia blog


Gluten-free Mushroom Pie

makes a 25 cm / 10-inch pie

Crust:
3/4 cup buckwheat flour
1/2 cup rice flour
2 tbsp potato starch
a pinch of salt
5 tbsp olive oil
2/3 cup water, or more if needed

Filling:
200 g champignons (or other mushrooms)
70 g baby spinach
100 g feta cheese

Egg milk:
2 organic eggs
1 2/3 cup oat milk (or other plant-based milk)
2 tbsp fresh thyme
salt & black pepper

METHOD:

1. Preheat the oven to 200 C / 400 F degrees. Measure the flour and salt to a large bowl and mix well. Add the olive oil and water in a few batches while stirring. The dough should be slightly sticky, but easy to handle by hand. Press the batter to the bottom and to the edges of the pie tin and bake for 10 minutes. Prepare the fillings in the meantime.

2. Clean the mushrooms (if needed) and cut into small pieces. Heat a frying pan and cook the mushrooms in olive oil for a few minutes until they are slightly browned. Add the spinach and mix it with the mushrooms. Season lightly with salt and black pepper. Add the mushroom filling to the pie and crumble the feta cheese on top.

3. In another bowl, break the eggs and mix with the oat milk. Season with fresh thyme, salt and pepper. Pour the egg mixture evenly to the pie. Bake for about 30 minutes until the pie is slightly golden. Allow to cool for a moment before serving and then enjoy the pie as it is or with a nice salad!

TallennaTallenna

Late Summer Juices + my tips for juicing!

Late Summer Juices + my tips for juicing!

this post is sponsored by Wilfa.

I’m sitting at our kitchen table, wearing super comfy clothes, got my anti blue light glasses on, and I’m surrounded by an endless amount of boxes. After living out of a few boxes and in different places for eight months, we’re finally done with our #waterdamagefun. Damn was this whole thing a nightmare. But luckily we have a home now! Since moving is no one’s favorite thing, I thought we could talk about something else, liiiiike juicing! You see, I’m totally head over heels for cold pressed juices at the moment and have found my long lost love for beetroots (I’m drinking a beetroot juice while writing this, ha).

Late Summer Juicing | tuulia blogLate Summer Juicing | tuulia blog

I bought my first juicer about five years ago in the midst of a terrible flu and feel in love with it instantly. For a while I was an avid juice maker but for the last couple of years I’ve been juicing every now and then when a craving hits. A few weeks ago I got to try out Wilfa’s new Andante Slow Juicer and now I’m totally back in the game.

There are two kinds of juicers in the market: cold pressed juicer and centrifugal juice extractors. The latter are the ones you usually in juice bars, as they’re quick at making the juice and you can put whole fruits in the machine. Cold pressed juicer are a bit more fancy, as they press out the juice slowly from the ingredients (you can read more about the differences here). The slow juicer I got (and my old one) are both cold pressed juicers and I prefer these as they keep more nutrients in the juice and produce less waste, which means you’ll have more juice! It takes a little more time when using a cold pressed juicer as you’ll need to cut the fruits and veggies into pieces and there are several parts to wash, but in my opinion the juice has a much deeper and more delicious taste. And as a hater of scrubbing tiny parts and multiple dishes, I’ve got to say that I’ve been pretty amazed how quick it is to clean Wilfa’s juicer. And even if the cleaning part is a bit easier, I still like to make a big batch of juice at once so that there’s no cleaning involved in a few days :)

Wilfa by Hurom Andante Slow Juicer Juicing at Home | tuulia blog
Besides juicing fruits and veggies you can also use this juicer for nuts, avocado, wheatgrass, and berries, and next up is definitely making almond milk. So you might see me go crazy with homemade nut milks and treats involving it. But in the meanwhile, I thought I’d share two of my current favorite juice combos. I’ve got a Kale, Pear & Cucumber Juice and a Beetroot, Fennel & Apple Juice, aka late summer juices as most of the ingredients are now at their best season. The combination of beetroot, fennel, and apple is so tempting that I think you’d like too (thanks so much for one of my followers for  sharing the idea on Instagram!). And below is a collection of my tips for juicing to get you started. Juicy times to you, my friend!


My tips for juicing

The ingredients:

  • Most fruits can be used without peeling the skin, but then it’s best to use organic fruits. For example, I juice apples and pears unpeeled.
  • However, citrus fruits like lemon, lime, orange and grapefruit should be peeled. And the some goes for melons.
  • Do not juice the hard stones of mango, cherries, peach, or nectarines. The small stones of apples and pears can be juiced, especially if you’re juicing just a few.
  • Cut hard veggies, like carrots, beetroot, and celery to small pieces.
  • If you’re using large leafy greens, I recommend tearing them into smaller pieces so that your juicer won’t get stuck.

Juicing:

  • It’s definitely easiest to wash the juicer straight after juicing when the pulp is still moist. Do not let it dry for hours and then try to wash it (like I sometimes do :)).

About the recipes:

  • When choosing ingredients, I like to think about what color I’m in the mood for. For example, carrot, beetroot, orange, red cabbage, grapefruit, and ginger go together for their color and taste. Leafy greens, cucumber, celery, fennel, broccoli, lime, lemon, apples, kiwi fruits, and pears are great for green juice. I usually pick up 3 to 5 ingredients for my juices.
  • Use your creativity freely and try all kinds of combination that you’re in the mood for! That’s how I’ve found my favorite mixes.
  • Juices are great bases for smoothies too and I like to sometimes replace plant-based milks with juice. A few pieces of frozen spinach, some pear, and a couple ice cubes with a splash of green juice make a wonderful smoothie.

Beetroot, Apple & Fennel Juice | tuulia blog Kale, Pear & Cucumber Juice | tuulia blog


notes: I recommend using organic ingredients as much as possible, especially if you’re using them with their peel. apples and pears should be a bit raw when juicing, as they produce more juice and less pulp!

Kale, Pear & Cucumber Juice

a big handful of kale
1 big cucumber
2 pears
1 lime

METHOD:

Rinse and cut the fennel and celery into small pieces. Peel or wash the pears carefully. Cut the lime into a few pieces and remove the peel. Juice all ingredients, serve, and enjoy! Store the rest in a sealed glass jar in the fridge.

Beetroot, Fennel & Apple Juice

5 beetroots
2 apples
1 big fennel

METHOD:

Peel or wash the beets carefully. Rinse the apples and cut the beets and apples into small pieces. Juice all ingredients, serve, and enjoy! Store the rest in a sealed glass jar in the fridge.

TallennaTallenna

TallennaTallenna

TallennaTallennaTallennaTallennaTallennaTallennaTallennaTallennaTallennaTallennaTallennaTallenna

TallennaTallennaTallennaTallenna

Gluten-free Banana Zucchini Bread

Gluten-free Banana Zucchini Bread

You realize that you’re pretty deep in the food world when you find yourself typing zucchini quotes to your search bar. I probably had an idea to say something funny about zucchinis and this was the best I could find:

”Vegetables are a must on a diet. I suggest carrot cake, zucchini bread, and pumpkin pie.” -Jim Davis

One of my favorite things in cooking is to use vegetables in baked goods and in surprising ways. Like using carrot in breads, nettle in omelettes, sweet potato in cake batters, avocado in desserts, and so on (okay these are not probably surprising ways to us foodies but to my dear grandmother who’s reading this these might sound pretty extreme). So lately I’ve been loving zucchini (it’s one of my absolute favorite veggies) and ended up making this banana zucchini bread last week. As soon as the first loaf was finished I had to make another just because my family, and especially my dad who is now trying to give up white sugar and is a total cake and desserts lover, loved it so much. And the best thing? This one is super easy.

Banana Zucchini Bread (gluten + dairy free) | tuulia log

This recipe is actually a replication of two of my previous recipes: the banana bread here on the blog and the zucchini muffins on my free e-book. So I kind of just turned that muffin recipe into a bread by adding some zucchini to the batter and reduced the amount of bananas a bit, which made the bread even more moist than just the regular banana bread, a.k.a. just the way I like it. It’s really nice fresh from the oven, but as a lover of some over-the-top treats, I like to have my piece (or let’s be honest, two or three..) with some coconut yogurt, banana, fresh berries, and a drizzle of maple syrup. Yum. What a wonderful thing this life is. Sending you guys lots of love and feel-good vibes! xo

Banana Zucchini Bread (gluten + dairy free) | tuulia log


Gluten-free Banana Zucchini Bread

notes: I’ve tried this bread with different mixtures of gluten-free flour and I always recommend baking with a mixture of two or three flours for the best result. I personally love the combination of oat, almond, and rice flour but buckwheat and millet flour are great in this too!

makes a 24×10 cm loaf

2 big ripe bananas
3 organic eggs
1/4 cup extra virgin coconut oil (or mild olive oil)
3 tbsp organic honey (or maple syrup)
1/2 cup oat milk
1/2 cup grated zucchini (about a 10 cm piece)
2 cups gluten-free flour* (for example oat, almond and rice flour)
2 tsp baking powder
a pinch of sea salt
2 tsp ceylon cinnamon
walnuts, rolled oats, and coconut flakes for decoration

METHOD:

1. Preheat the oven to 175C / 350F degrees. Cut the bananas to a blender. Add eggs, coconut oil, honey, and oat milk to the blender and blend until smooth. Grate the zucchini and place into a large bowl. Pour the banana mixture into the bowl and stir well.

2. Measure the flour, baking powder, salt, and cinnamon to the bowl and mix thoroughly. The batter should resemble a muffin batter and not a typical bread dough. If it feels too runny though, add a bit of flour.

3. Grease a loaf pan lightly with coconut oil and pour the batter to the pan. Top with some walnuts (I like to crush them by hand), rolled oats, and coconut flakes. Bake for 45-50 minutes until the bread is golden brown. Let cool before serving.

4. If you end up having some leftovers, I recommend storing the bread in the fridge. You could also freeze some slices of the bread and then just pop them to the toaster when a craving hits!

TallennaTallenna

TallennaTallenna

TallennaTallennaTallennaTallennaTallennaTallenna

TallennaTallenna

TallennaTallenna